Adding the Table

26 Aug

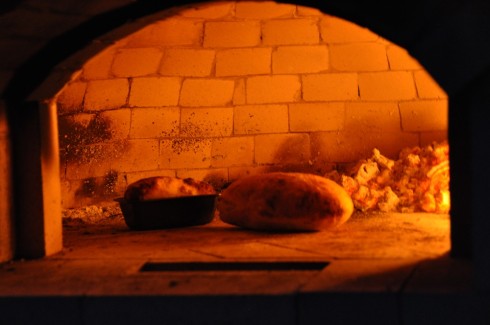
Well it has been a year and we have enjoyed the oven immensely.

But there were some things I could do to make it nicer.  The biggest thing was to make more table space.

So I framed up the area at the side of the oven with plywood and filled the bottom area with gravel.

I mixed about 7 bags of cement and filled the area for the table.  As I have said before, I am not patient enough to finish

concrete the way it is supposed to be done.   But I work hard at it.

 I think the table came out pretty good. 

The area behind the table was planted with herbs for use in the house and on the pizzas.

I have attached a photo …. Let me know what you think.

The First Loaf That Worked!

4 Sep

 Like many things… you are not successful on the first try. But on the second try, the bread came out great.

 My first loafs were put in the oven last time and left for 20 min.  I cook bread in the inside oven in 35 min.  So I was going to check on it at the 20 min mark.  The tops were burned black!

 Next pizza party….. more bread was made for after the party.  I left the oven door off and watched it cook. 

It was fantastic!  The loaf rose like it was supposed to and then the crust was just as crispy as a cracker.  When we cut it open the crumb was perfect. 

 So for now.  It is 1) leave the door off. 2) watch the cooking process and 3) it will be ready in about 16 min.

 I am on the track to getting better each time.

 Keep watching.

 Oh and by the way…. Calzones are the best in a WFO.  Don’t forget to try them too.

The Pizza Has Landed!

17 Jul

 One small step for mankind ….one giant leap for one man.

Yes we cooked pizza on Friday. The oven was mostly finished and needed to be used. So Friday was the day.

My in-laws were here and were to leave the next day. So we decided to get some good friends together and give it a run. I wanted friends who would honestly tell me if it was good or not… and would not be offended if we ended up ordering pizza from the store in case all went crazy and the whole thing crashed.

I started with a simple pizza crust recipe at about 3 pm. Mixed it and left it to rise. Then I kneaded it again and set it aside in balls to rest until the zero hour.

I started the fire 2 hours before cooking time and had a great 75 degree day to watch it burn. This was sent from God because Wednesday had checked in at 105 degrees. It was interesting because I had read about placing logs on the edge of the oven interior (separated from the fire) and watching them burst into flame as if on their own when the fire was hot enough. It was amazing to see a log just start on fire without any contact with the rest of the fire. (OK, I know how and why it happened but it was still fun to watch).

Note to self: in our southern climate I can see that the pizza oven will be a winter sport more than a summer one. Huddling around a 700 degree oven will be really fun when the temps are in the 40s. but don’t think for a minute that the summer will require less pizza!

The friends started arriving and the toppings were out and ready. The dough rolled out pretty well and the pizzas started coming outside for their time in the oven. (now I do have to say I had already made a trial run on my own pizza just so I could look like I knew what I was doing. And that one turned out great.)  The oven performed superbly and the pizzas were rolling out at a nice clip. Everyone was happy and ate their fill.

When someone new came later in the night, I just added some smaller pieces to get the fire burning and we were off again.

 had seen a simple hook type tool which was used to turn the pizzas as they are cooking. That one was just a piece of wire bent in a hook.  Mine will have to be more elaborate of course but I think that will be easier to use than the turning peel. And I need a brass brush to clean the floor of the burned flour falling from the peel and the pizza bottoms.

We did learn that more is not better when it comes to toppings. The lighter more assorted pizzas were better than the heavier saucy ones. But in the end, all were great.

I was excited to have a good first run and the good times with friends.

The oven was certainly worth all the efforts, money, and time.

It is an interesting conversation piece, and a great addition to the yard.

The Oven is Done!

11 Jul

Well the time has arrived and the oven is finished.

Well almost.  It will always need something, or I will want to add something, or I will remake something when I get a new idea.  But that is just the way I am.

Well enough of that…

I went out and started working on the roofing last week.  I had to install the vintage slate roofing tiles for the finishing touch. 

I prepped the roof area by adding some stucco to level out the surface and allow the rows of tiles to be laid into the wet surface. I wanted to have a bond of some kind between the stucco and the tiles to help them stay in place.  I also add aluminum roofing nails through the slate’s nail holes and into the wet stucco for extra support when it cured.

The roof went up pretty fast and was relatively easy to do.  Even in 100 degree heat.  I imagine some of the truest of bricklayers may have a problem with how it is done… but I think it turned out well and seems to be ok for now.

All I have to do now is:

1) add a horizontal row of slate at the top of the eve to cover the nails.

2) cut the firebrick I am using for the outside of the hearth.

3) maybe some stucco on the block base.

4) build some killer looking hinges and oak doors for the storage space underneath.

5) paint the base section.

 OK… maybe I do have some more to do.  But not before the pizza starts flowing from the oven. 

Bring on the parties!

I will add some more photos when I get it all cleaned up and fixed.

 PS.   my wife’s list includes some more color in the concrete patio area, a gazebo with heat and AC, running water, hot tub and on and on and on….I will have deal with all that later.


The Tile is Going Up on the Outside

5 Jul

 This week was a fun one at the pizza oven. 

I got to put the tile on the outside and an almost finished with the whole thing.

I had the tile waiting in a pile for just the right project and this was it.

I had applied the stucco so that the sides were relatively flat, and smooth.  OK, I was not exactly flat and smooth but I thought I could make it work. 

The mastic went on well and the tile stuck just fine.  I know there are some thick joints here and there, but I could notbelieve how hard it was to get the cuts just right where you want them.  I have cut

close up of the front detail

the whole thing with an angle grinder.  It would be nicer with a tile saw…but no tile saw and I needed to move on.

So I cut them and applied them without any problems.  The front decorative pieces went on easier than ever expected.  They are on sale pieces from Lowe’s, so they were half price.  Nice!


Well I am moving on to the roof now. The vintage slate will finish the look and give it a nice old world feel.  As always, I’ll let you know how it goes.

The Oven Marches On.

28 Jun


Another week has gone by and the oven is getting closer and closer to being finished.

I just returned from spending a great weekend in the mountains. We had a great time with my brother and his wonderful wife.  We talked, we walked, and we ate.  Boy did we eat.  By the end of the weekend we were all saying enough is enough.  But as good as the food was … there was no wood fired oven food on the trip.  It was there we just didn’t eat any.

That brings me home to the oven.  I went out and checked the structure to see that it was all in great shape.  The insulating material has been formed into the shape of the house and it was then covered partially with stucco. 

I still have to level the top and edges,   but the design is there and ready to have the tile installed on the sides.  I have cut the tile for the front (using my angle grinder) and will move to the back on the next time out. 

As you can see in the photo, the roof needs to be filled in so I can install antique slate tiles to give it that old school look.

I have made an interesting tool. A blow poke.  The tool is made of a piece of pipe with a metal hook added to help moving embers and wood around the oven. 

The pipe also allows you to blow on the fire to

help it get started. 

The best part about it is that you will not singe your eyebrows when you do it. 

The blow poke allows you to stay 4 feet away. 

So check it out and let me know what you think.

Ash slot

11 Jun

I figured out the ash slot yesterday, and was able to cut the bricks to make it work.

I decided to not worry about closing the hole when not in use. I had thought it would be a problem but I played around with it and determined there was no need to close it. The slot is only about 3 inches deep and one brick wide.

The ash slot lives!

So I cut the bricks to size and mortared them in place.

I think it will look nice. The firebrick comes out to the edge of the chimney area and the tile will finish off the look on the outside area.

I will be posting on the insulation layers shortly….almost done!

First Fire!

7 Jun

Yes here is hope for the oven to be finished.  the first fire was made today and the drying has started.

The chimney drew pretty well and I am happy with the results.

Here is the view from the house, showing the smoke comming out where it is supposted to comeout.

view from the house

stay tuned for future developments….there is pizza in the air…

Well it is time to get going on the oven!

31 May

  The winter is over, the weather has warmed up and I am way behind schedule on the building.  I had wanted to be cooking pizza before it got warm in theNorth Carolina, but the colder than usual winter got in the way.  Now we always have cold times during our winters, but this year it seemed to never get above 40 degrees for more than a day or so at a time.  And building the brickwork for the dome seemed to be an important part of the process, so I wanted to get it right,

 On we go!    I had my floor laid down and all the bricks cut in half.  The “I” tool was ready and had been tested and worked well.  I just needed the fire mortar.  What a shock.  I had to order it from the brick supplier and it cost $85 for 50 lbs.  I thought I would buy 3 bags and just go with it till I found out the cost…. One at a time was the new rule.  I was not going to have one of these bags get hard in my garage while I waited to use it….

 I got all set up and the first rows went in very easily. The I tool was working great and I mortared the front half of the joint and adjusted the angle with small rocks and brick parts.

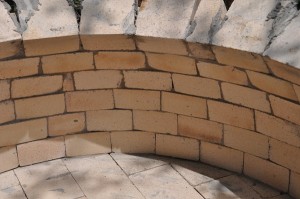
It all seemed to go well.  I got about 6 rows done and decided to let the mortar set and come back another day.  Guess I thought it was going too well and it might screw up if I pushed too much.  

 It all went well and was hard the next day… so onward and upward.  The Heatstop 50 mortar is really a good product; it held the bricks in almost any angle needed.

I soaked each brick for about 60 seconds before use and then let it drain off all the excess.  This made the mortar stick well and not dry out.  If you don’t get the excess water off then the mortar will want to slide off.

 I had to wait about 3 days until I could get back at it.  I was into the top of the dome… fun times.  The neighbors thought I was making a bee hive. 

 The bricks needed to be cut more often, and in unique angles during this phase.  But I was still using a chisel and hammer and was able to do it.  The gaps in the back of the bricks would be filled with mortar later, so that was not a problem.   I made the inner arch as I came to it…not too hard, I had a metal arch to guide me and the transitions to the dome were just not that bad.  I was worried about that portion of the build so that was a welcome situation.

The top was closed the next day… not as pretty as many I had seen, but it went well.  I had a piece of wood under the hole for support and just cut the bricks and wedged them in place. 

And it was done!

 Cool.

 The front arch was made a little larger and it went in just as easy as the first. 

 After it all had set for a while, I filled in all the spaces.  For a while I used a mortar tube.  It was a rubber cone that you put mortar in and squeeze it like a cake decorator and it shoots the mortar into the spaces. That worked well and then I just troweled the rest in to cover the gaps and the brick ends, and left it to cure.

 Now I am off to finish the chimney and start on the outside.  I want to have a slate roof made of this stack of vintage roofing tiles I bought from someone in the historic district inWilmington.  It will be looking cool when it’s done.

 Stay tuned and see the next step


 …. And it will not be delayed by any cold weather!


A set of Peels

20 Feb

I had to do something, It has been raining or cold for the longest time, and I needed to do something connected to the oven. 

So while I was at the steel supplier the other day and found some stainless steel in the drops yard. (a place where short pieces and castoffs are stored).  A quick selection of the pieces I needed and I was off.

I had researched peels used for pizza cooking and had an idea of what was needed.  I had to have at least one for inserting pizzas in the oven and one for turning them while they are in the oven.  The larger one was to be about 16 inches wide.  It needed to be big enough for the pizza and small enough to get into the oven door. And the turning peel is traditionally a circle, 8 inches in diameter. 

I sat down at the computer and drew out the designs so that they could be cut on the CNC plasma cutter.   The design was converted into the language of the computer guided plasma cutter.  This thing takes lines on the screen and drives a plasma cutter to trace the same design. 

The plasma cutter is a tool that cuts steel by creating an electrical arc and blowing air through the same area thus cutting the steel.  It’s really fascinating to watch…except you are not supposed to watch it because it will burn your eyes out or something like that. 

Anyway, I have my two peels and I started searching for some oak handles to put on them.  I went to the wood section of Lowe’s and selected some 2”x1” clear straight grained oak and was off on a quest to make saw dust.  I cut a slot in the end for the peel to go into and carved a nice comfortable couture with an angle grinder and a flap disk.  Yes a bit of overkill… but it went fast.  Sanded for about an hour and then three coats of polyurethane for protection.   The handles were then drilled for a ¼ inch brass rivet and secured by rounding the heads over a stainless steel washer.

I know I could have purchased them for about the same money. I mean pizza peels are not expensive, but the fun of making them will greatly out weigh the cost or any problems caused in their construction. 

 My peels have a soul, a kind of story they will tell.  I made them, and there is certainly a lot of satisfaction in knowing they came from my mind and hands.  It may not even be noticed by others, but I will remember…each time I use them.

 And that will bring a smile to my face.